RUNNING THE MIGHTY MINI USING A PID CONTROLLER

Welcome back! We are so glad you're back with us today. Just like we promised, we're going to run the mighty mini again. Now if you've already read the first mighty meaning run, we ran three gallons of mash through that. We're going to use the same internal 2000 watt heater element. So 120 volt, but instead of using the variable control, we're going to use the P ID controller that we put together so I'll get into the description about this in just a moment. The primary difference is that we've removed the bone and the digital thermometer from the top. And what we've done is we've placed the thermocouple and the thermocouple has been inserted into the bone and we'll just place they in the column.That's what we'll check the head temperature.
We're going to run this as a pot still. The great thing about this is, you have the option to run it either as a pot or is a reflux still, and the difference between the two a partner reflux still isn't a pot still you can normally expect about 130 to 150 proof somewhere in that neighborhood, but you do retain a whole lot of flavor in a reflux still, you'll probably you can kind of expect anywhere from 170 to 190 proof but the trade off is is that you can strip a little bit more flavor out of your mash into your distillate. Kind of rely on or focus on a lot of your technique on the pot aspects running an operation so you get the most out of it you get the most bang for your buck.
The temperature starts to rise so I want to get to this but I just want to make sure we explain this first I've got two rolls of copper that I've cut off and I put it into the column I call about 18 1618 inches and roll them up. This is not the only way to do this. You can do it any way you like. And I've got two of these inside this column which makes up for the copper that I want in that system somewhere.
The sink in your kitchen, a washer, hook up the hose. I have no idea what you're going to use, but they sent you an adequate amount of hose to get you started. And I just recommend you go out and offer 40 to 60 cents a foot, you buy yourself some,some hose, or some additional extra hose
because I'm going to use a water pump I've got a 52 gallon or 52 quart water cooler there, I put ice water in it and I put a submersible pump. And I just pump water in. So I'm pumping cold water into the bottom of my condenser, and it comes out the top of the condenser and goes right back into that 52 quart. I'm just cycling water, you can do that t there's 100 different ways of doing it.
The only thing you have to do is make sure that the water that you use in your condenser is a little bit cooler than the vapor temperature and the vapor temperature is going to be whatever you've got it set at. I've got a small piece of chemical resistant hose I'm gonna put here and that way I can put my collection jar anywhere I like and I can just make sure It goes to it without splattering all over the place.
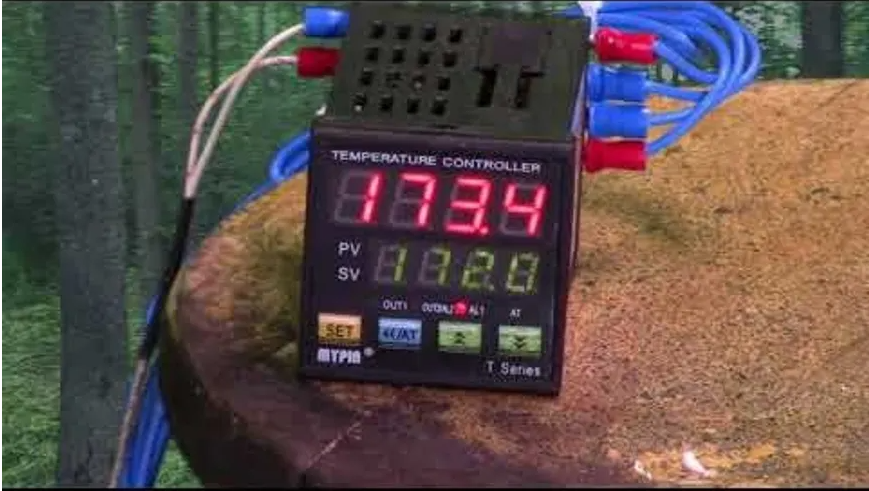
You could put a couple of books down here. And you could build this up to where your collection jars directly below your spouse, your spigot. You can do many, different things. Here's the controller. And I've got this plugged into 120 volts. You will kind of hear rumbling in the background, or 2000 watts is a whole lot of power. If you'll notice down here, I've got an ant meter that goes from zero to 20. It's at 16. If you use the calculator and you're trying to figure it out, why don't you divide it by volts because of the 16.6 or 16.6 amps. And you can see there unraid over 16 and a half amps.
And it's right now it's sensing 79.4 degrees Fahrenheit, because I was able to change the TD from Celsius to Fahrenheit. And I've got a set for 130 you can see my lights on in that light indicates that there's power going through that solid state relay, which is making that work. Let's adjust the temperature.
Almost stretch the cable that far. I just want to be aware that we got it working. The first thing we're going to do is we're going to press this little blue button which is next to the set button. And what that'll do is that'll highlight the very first zero, you see it flashing, and if that's the one we want to change, we will use the up or the down arrow, one of these two, let's go up. You see a channel change it to 123.
Let's go back down to one zero. If I don't want to change that digit, I'll just push that blue button again and the next one will light up, it starts to flash. Then the next one will start to flash. And the last one will start to flash. We want to set this at 200. There's 330 degrees Fahrenheit is what we got to set it. But we don't want it to be that hot. We're going to go back, we're going to leave it at 130 degrees. Once we're set there, we just hit the Set button, and it goes back to its normal operating mode. It's not that hard to set, not that hard to operate. They're relatively straightforward.
We should start to register a definite spike or an increase in temperature. And then we're going to make sure and what I'll do is I'm feeling the column, and I can feel it here starting to warm up, but it's still cold to the touch. When this column starts to heat up, it'll heat up red rapidly. You'll feel it here get hot, and it'll be cool and cold. When it gets warm in the center. That is its most rapid heat up phase.
That's the time you turn the water pump on or your water flow from your hose or your sink or whatever you get your water source from for the condenser. So we'll let it go for a few more minutes.
The first thing we're going to do is we're going to set this for once it hits 130. We're gonna go back in and set it for 169. We could pull off the four shots in the heads. Almost 10 minutes or so but what I did was I reset this to one team And the reason I said it's 110 degrees is because I was in a hurry to get it to start doing something, and right now it's 111 degrees. And it keeps dropping off and coming on and dropping off. It's what it's trying to do is trying to find that band of excellence, that perfect setting in that temperature to stay on or stay off, whatever the case may be with the appropriate amount of power to keep my head temperature at the right temperature.
We're gonna leave it I'm gonna let it play us with a cell for a while it will be what I did was now this was only been like two minutes, I reset it to 150 because I wanted to make sure I got it right past that methanol level of 145. And sure enough, right now it's bouncing back and forth and is trying to and it's found his band of excellence 151 50.7 and it drops back to 149 and 150 is great. I've got the pump hooked to this as well with my pump switch on because that's on the bottom part of the receptacle.
I'm at 152, I've got to sit at 150. And you can see how my amp meter keeps, keeps popping in and popping out as the light keeps coming on for operations for the outflow, as it continues to find that balance to keep it at 150. At the same time, coincidentally, I noticed a couple of drops come out. So I'm guessing that the methanol is kind of coming off, but what we're going to do is we're going to set this to 169 and see what happens.
Blue Button will go up a 160 it will skip that one, skip that one and go to 169, 169 and set. Now we're gonna let that set and wait what happens. I'm gonna make this a whole lot easier by moving this plug around the other side of that, there we go.
My aunt meter is popping in and out. We're 153 and I've got a cent for 169 and it continues to try to find its way. So your P ID is working exactly as planned. And we're going to let this thing continue to operate till it gets to one second then we'll let it sit there for about 10 minutes.
The purpose of that lead is set there to draw off all of the methanol in the four shots that are located inside my mash because remember you have to go through 145 in In order to get to 178 179 181,, however your still operates, but right at that ethanol, vaporization temperature, it goes to 145, which is a methanol, and then all of your heads, all of those, low oils that are, alcohols that you don't want that you don't want to collect. And that's all we have to worry about 169. So if you let it sit there to a 169 for about 10 minutes, it'll continue to produce and when it stops producing, all of that is gone.
But remember, you haven't reached your ethanol level yet. So we'll wait when it stops producing.
Then we'll turn the temperature up to the ethanol level and we'll start collecting our hearts. Our hearts will be collected all the way through this process until we get to the very end, where we'll start to use our human senses which is going to be our nose and our taste buds to find out when we've gotten to our tails. So that's how you separate the heads from the heads in the four shots from the hearts now.
There are a couple of rules of thumb if you're used to based on the alcohol by volume, the ABV of your wash, if you know that you're going to anticipate to collect about a half of a gallon. And you know, that's what your anticipation is, when you get shy of that about 80% of that collection, is when you start to look for your tails, your tails are going to be on the back end. That's why they're called tails, they're going to be on the back end are going to be those really terrible oils in lower alcohols and things that you don't really want that are going to give you a really terrible taste.
They sneak in and you cut your spirit, it'll turn cloudy, and it just you just can't seem to get it to clear up because you had tails in there. And that is because those tails are there. I'm trying to remember how to describe that it was they will liquefy in a high alcohol content environment. But as soon as you introduce water They start to turn solid, globular, and therefore it becomes cloudy.
So you want to make sure the tails aren't in your spirits. We'll collect about 80% of what we're anticipating is for three quarters of a gallon, I would say that probably about two quarts a little over two quarts.
Let this run right now at 161. And we got to set at 169. So we'll give it some time. And we'll see how this process works. And then later on, we'll turn it up some more. And we'll let it run on its own. You'll notice on the bottom, you've got 169 degrees as our, that's our set temperature, that's what we set in the P ID in the top temperature, the one that keeps changing. That's the perceived value. That's the temperature that's being tested. Right now through that thermocouple at the head of the still. You'll notice that it's going really slow. It's trying to find its balance.
The red light flashing on and off. That's our P ID and our solid state relay turning on and off with their measured amount of power and current in order to bring that temperature to 169 and maintain it. So it's feeling its way. It's finding what we call that band of excellence, which would be the 169 is closest possible you can get to it without overshooting it or under shooting it.
I've got your power at the top and I've got that receptacle separator. I'm using the bottom for the water pump and that's what the switch is for. And there's our ant meter, or ant meters, indicating that it keeps giving jolts just jolts of electricity just enough to keep it going and find out as it's measuring. until it gets to 169 Amazing.
I've held it at 169 168 no 160 8.916 9.2 169 point 1.3 then back down to, we've held it there for about 10 minutes so that I'll tell you what I love about the pod. I love the operation, you just got to give it time and give it a chance to find its perfect balance. It ensures it surely will. Now we've collected this as you'll read here this is for this batch. Remember I told you that each batch is a little bit different. So there wasn't that much.
What we're going to do now is when we get another container, we're going to set this up to ethanol level and then we're going to start collecting our hearts. So we're going to set this for ethanol temperature. So reset that a push the blue button in the first digit starts to flash that's more than one behind the decimal point. I'm going to push it again to get to the next one. We're going to do one, go to the next one 179 and set, not gonna let that sit at 179. So now my heater elements are gonna come back on, or at least come back over a longer period of time with more power until this P ID allows it to bring that temperature up to 179.
I've got the water still running through my water pump. And we'll allow that to run. If that's not enough, we'll move it up to 180. If that's not enough, we'll move it up one degree at a time until we get a good run. And we've got what we call the spurt grip grip, so it's an interrupted, run about the size of a pencil lead. And when we get there, we'll just let the P Id take over and control it from that point on.
Well hang in there as this that's what makes it so easy. This is just a little over 100 155 proof. And that was the first couple of half pints that came out. We're getting close to the tails. And I know that I only t based on volume, so we're going to do our two we're going to cut our tails the same way we did on the other discussion when the variable controller, but this time we'll just use the P ID.
It's economical. It's compact. And it's electric. What Walker jazz for? Well, we're going to get ready to shut her down here just a little bit and remember that you'll be able to smell. No, we're still good. We're still in our hearts. You'll be able to smell, to taste when the time comes to cut off of those tails. I'll stop collecting at the end of my heart and I'll just dump the rest and start over again.
Now remember, you can do this the same way you run the outback, or just the standard eight gallon, two inch column or the three inch column or the brewhouse model, they're all run exactly the same way the process is all the same, the equipment's just a little bit different.
So until next time.